If your car is pulling to one side after a windshield replacement, it’s a clear sign the camera for your Advanced Driver-Assistance Systems (ADAS) is misaligned. This isn’t a mechanical issue but a problem with the car’s « digital senses. » Even a one-degree error in the camera’s viewing angle is enough to make the lane-keeping system steer incorrectly. The only solution is a precise electronic recalibration, a process that retrains your car’s brain to see the road accurately through its new lens.
You drive away from the glass shop with a pristine new windshield, but something feels off. On the highway, you notice the car gently but persistently pulling to one side. The lane-keeping assist, a feature you once trusted implicitly, now seems to be fighting you, nudging you toward the shoulder. Your first thought might be a wheel alignment issue, but the truth is often located just a few inches from your rearview mirror. The problem isn’t with your tires or suspension; it’s with your car’s eyes.
Modern vehicles are equipped with a sophisticated ADAS calibration ecosystem, a network of digital senses—cameras, radars, and sensors—that constantly monitor the world around you. The forward-facing camera, typically mounted on the windshield, is the primary « eye » for features like Lane Keep Assist and Automatic Emergency Braking. When a technician replaces the windshield, they are performing the equivalent of eye surgery on your vehicle. Simply installing the new glass isn’t enough; the system’s brain must be retrained to see the world perfectly through its new lens.
Many drivers are told they just « need a calibration, » but this advice often misses the critical context. The real key isn’t just *that* a calibration is done, but *how* it’s done. The precision required is microscopic, and a tiny deviation can have significant consequences for vehicle behavior and safety. This guide will move beyond the simple advice and explain, from a technician’s perspective, the intricate science of ADAS calibration. We will explore why your car is pulling, what a proper calibration entails, and how seemingly unrelated repairs can disrupt your vehicle’s sensitive digital network.
To understand the precise steps needed to restore your car’s safety features, this article breaks down the most common causes of ADAS malfunctions and their expert-level solutions. Follow this guide to become an informed owner who knows exactly what to ask for at the repair shop.
Summary: Restoring Your Car’s Digital Senses After a Repair
- Dynamic vs. Static Calibration: Which Method is Required for Your Camera?
- How to Tell if Your Radar Sensor Is Misaligned by Just 1 Degree?
- Dealer vs. Glass Shop: Who Calibrates ADAS More Accurately?
- The Repainting Mistake That Blinds Your Blind Spot Monitors
- When to Calibrate ADAS: Is It Necessary After a Wheel Alignment?
- How to Recalibrate Ride Height Sensors if Your Car Leans to One Side?
- The Drilling Mistake That Causes Rust Under Your New Side Skirts
- How to Prevent « Phantom Braking » Events on the Highway?
Dynamic vs. Static Calibration: Which Method is Required for Your Camera?
After a windshield replacement, recalibrating the forward-facing camera isn’t optional; it’s a critical safety procedure. In fact, industry data shows that over 89% of new vehicles require this service to ensure their safety systems function correctly. The method used, however, depends entirely on the manufacturer’s specifications. The two primary types are static and dynamic calibration, and they are not interchangeable.
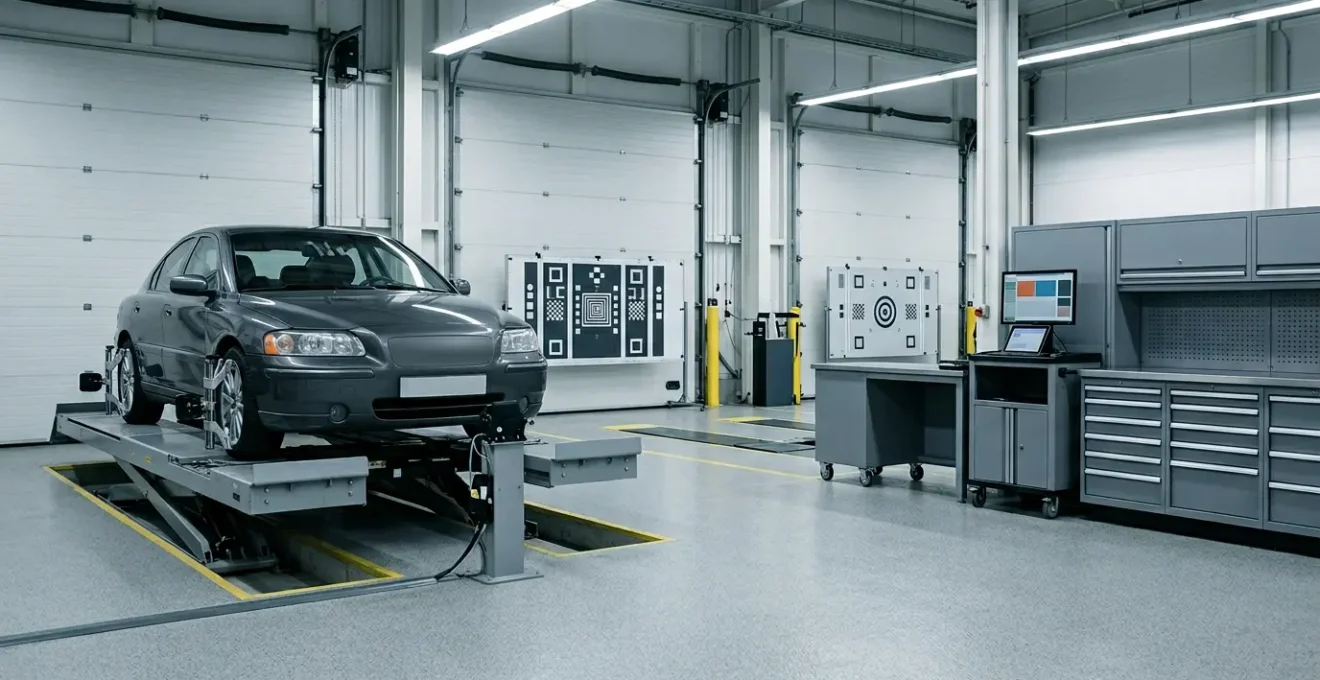
Static calibration is performed in a controlled workshop environment. It requires a perfectly level floor, specific lighting conditions, and a set of proprietary physical targets placed at exact distances and heights relative to the vehicle. The technician uses a scan tool to put the ADAS module into a learning mode, where the camera identifies the targets and establishes its precise position and viewing angle. Think of this as an eye exam in a doctor’s office, using a fixed eye chart.
Dynamic calibration, by contrast, requires the vehicle to be driven on well-marked roads at speeds specified by the manufacturer. During the drive, the camera recognizes lane markings and other road features to self-calibrate. This method is dependent on clear weather and visible road lines. Some vehicles require a hybrid approach, where a static calibration must be completed successfully before a dynamic road test finalizes the process. Attempting the wrong method or performing it in incorrect conditions will result in a failed or inaccurate calibration, leading directly to the pulling or drifting you’re experiencing.
How to Tell if Your Radar Sensor Is Misaligned by Just 1 Degree?
While the camera is the primary sensor for lane-keeping, the radar sensors used for adaptive cruise control and forward collision warnings are equally sensitive. A misalignment of just one degree might sound trivial, but at highway speeds, this tiny error projects a massive blind spot down the road. Imagine aiming a laser pointer: a millimeter’s change in your hand results in the dot moving several feet across a distant wall. Your car’s radar works on the same principle.

A one-degree horizontal misalignment can cause your adaptive cruise control to « see » a car in the adjacent lane and react to it, or worse, completely miss a vehicle directly in front of you. Vertically, a one-degree downward tilt could make the system mistake a manhole cover for a stopped car, triggering a « phantom braking » event. An upward tilt could cause it to look over a smaller vehicle entirely. The consequences are not just about convenience; they are about safety. Research has found that a mere 0.6-degree camera misalignment can lead to a 60% reduction in reaction time for automatic emergency braking. The symptoms of a misaligned radar include:
- Your adaptive cruise control braking for no apparent reason.
- The forward collision warning system giving false alarms or no alarms at all.
- The system failing to detect vehicles you can clearly see.
These are not minor glitches; they are evidence that the vehicle’s digital senses are impaired and require immediate professional attention. A technician uses specialized radar reflectors and alignment tools to correct these micro-deviations with surgical precision.
Dealer vs. Glass Shop: Who Calibrates ADAS More Accurately?
When you need a calibration, the choice often comes down to the dealership versus an independent glass or repair shop. The common assumption is that the dealer is always the best option, but the more accurate answer is that the right training and equipment matter more than the sign on the building. A high-quality independent shop that has invested in certification and OEM-level tools can often provide the same, if not better, service.
A key indicator of a qualified independent shop is certification. For example, the introduction of programs like I-CAR’s ADAS Technician certification demonstrates a commitment to meeting manufacturer standards. This program requires technicians to complete extensive hands-on training, proving that an independent professional can achieve dealership-level expertise. When choosing a shop, you should ask if their technicians are I-CAR Platinum certified for ADAS or hold an equivalent qualification.
The crucial difference often lies in the diagnostic tools and access to up-to-date software. Dealerships have a direct line to the manufacturer’s latest procedures, while independents rely on high-end aftermarket tools that may have a slight lag. However, a top-tier independent shop will subscribe to services that provide OEM repair procedures. The most important thing you can do as a consumer is to ask for documentation: always request a copy of the pre-repair and post-repair scan reports, which prove the work was done and all system faults have been cleared.
To help you make an informed decision, here is a breakdown of what to consider when comparing a dealership to a certified independent shop, as this comparison shows:
| Factor | Dealership | Certified Independent Shop |
|---|---|---|
| Diagnostic Equipment | OEM-specific scan tools with guaranteed latest software updates | High-end aftermarket tools (may lag in software updates) |
| Technician Training | Brand-specific factory training | I-CAR Platinum or equivalent multi-brand certification |
| Pre/Post-Scan Reports | Standard practice at quality dealers | Available at certified shops (ask to verify) |
| Cost | Typically higher labor rates | Often more competitive pricing |
| Key Question to Ask | « Is your software updated for my [Year/Make/Model]? » | « Are your technicians I-CAR certified for ADAS? Can you provide pre/post-scan documentation? » |
The Repainting Mistake That Blinds Your Blind Spot Monitors
The ADAS calibration ecosystem extends beyond the windshield. Many modern vehicles house radar sensors for blind spot monitoring (BSM) and cross-traffic alerts behind the plastic bumper covers. These sensors are designed to « see » through the bumper, but they are calibrated for a specific material thickness and composition. This is where a seemingly simple cosmetic repair, like repainting a bumper, can go wrong.
Radar units operate at a high frequency (typically 24 GHz or 77 GHz), and the waves they emit are sensitive to obstruction. An excessive layer of paint, particularly metallic paints, or the use of thick body filler to repair a crack, can effectively blind the sensor. The radar waves are absorbed or reflected incorrectly, preventing the unit from detecting a vehicle in your blind spot. As official repair guidelines from manufacturers like Toyota state, anything that obstructs the radar’s field of view will impair its performance.

Anything blocking the radar will impair its performance – ice, mud, snow and especially a fresh coat of paint!
– Toyota/Lexus Official Repair Guidelines, Blind Spot Monitoring System Service Documentation
A qualified body shop knows that bumper covers with embedded sensors require special procedures. The total paint thickness must not exceed the manufacturer’s specified limit (often measured in mils). If a repair requires filler, it must be a special, radar-transmissive type. If your BSM system starts acting up after a cosmetic repair, the cause is likely an incorrect paint or repair procedure, not a faulty sensor. The fix involves stripping the bumper and repainting it correctly, a costly mistake that could have been avoided.
When to Calibrate ADAS: Is It Necessary After a Wheel Alignment?
A common and dangerous misconception is that ADAS calibration is only needed after a major collision or windshield replacement. In reality, many routine maintenance procedures can alter the vehicle’s geometry enough to require it. A prime example is a wheel alignment. According to industry studies, an alarming number of necessary ADAS calibrations are missed during routine repairs.
When a technician performs a four-wheel alignment, they are adjusting the angles of the tires relative to the vehicle’s chassis. This directly affects the « thrust angle »—the direction the vehicle travels when steered straight ahead. The ADAS camera and radar are calibrated to assume the car is moving perfectly straight when the steering wheel is centered. If an alignment changes this thrust angle, even slightly, the camera’s baseline is now incorrect. The car might be tracking straight, but the camera thinks it’s pointing slightly left or right. As a result, the lane-keeping system will try to « correct » this perceived deviation, causing the car to pull to one side.
Therefore, manufacturer repair procedures are increasingly calling for an ADAS calibration check or full recalibration following a wheel alignment. Other events that can necessitate a calibration include:
- Suspension repair or modification (changing the ride height).
- Changes in tire size.
- Any repair involving the removal of a radar sensor or camera.
- Even a minor front or rear-end collision.
Failing to perform a calibration in these instances compromises the system integrity. It’s crucial to work with a shop that understands this interconnectedness and consults OEM procedures for every repair, not just the obvious ones.
How to Recalibrate Ride Height Sensors if Your Car Leans to One Side?
If your car is visibly leaning or if you’ve recently had suspension work done, this can directly impact your ADAS performance for the same reason a wheel alignment does: it changes the camera’s perspective. The vehicle’s ride height is a fundamental input for the ADAS computer. The system is programmed with a baseline understanding of how high the camera is from the ground, which determines its viewing angle of the road ahead.
If worn-out springs cause one side of the car to sag, or if a new suspension component changes the height, the camera’s world view is tilted. This skewed perspective causes the system to misinterpret the position of lane lines, leading it to steer incorrectly. A car leaning to the left will cause the camera to see the lane as being further to the right, prompting the Lane Keep Assist to pull you to the right to « center » itself in what it perceives as the lane.
Recalibrating for a change in ride height is a two-part process. First, a technician must physically measure the ride height at all four corners, typically from the center of the wheel to the edge of the fender. These precise measurements are then entered into the diagnostic scan tool. This new data establishes the vehicle’s updated « level » stance. Only then can the technician proceed with a static or dynamic camera calibration. This allows the ADAS computer to recalculate the camera’s viewing angle based on the new ride height, restoring its ability to see the road accurately.
The Drilling Mistake That Causes Rust Under Your New Side Skirts
Sometimes, an ADAS problem isn’t a calibration issue at all, but physical damage to the system’s wiring. This is especially common when aftermarket accessories, like side skirts or running boards, are installed improperly. A careless installer might drill into the vehicle’s rocker panel to mount the new part without realizing that critical ADAS wiring harnesses run through that very area.
Drilling a hole can sever a wire, damage the insulation leading to a short, or create a poor ground connection for a sensor. To make matters worse, if the freshly drilled hole isn’t treated with a rust-proofing agent, moisture will inevitably get in and cause corrosion. This rust can spread to the electrical connectors or grounding points, creating intermittent faults that are incredibly difficult to diagnose. As technical experts note, electrical issues are one of the most common culprits behind ADAS-related error codes that mimic calibration failures.
Improper installation procedures like drilling without rust-proofing often indicate broader quality control issues. ADAS wiring harnesses and ground points for side-mounted ultrasonic or radar sensors frequently run along rocker panels—exactly where side skirts are mounted. Careless drilling can easily damage these wires or create poor grounds, leading to intermittent electrical faults that mimic calibration problems but are actually caused by damaged infrastructure.
– Car ADAS Solutions Technical Team, Understanding ADAS Error Codes and What They Mean
The symptoms of a damaged harness—such as a « Blind Spot System Unavailable » message or erratic sensor behavior—can look exactly like a calibration problem. A shop might attempt to recalibrate the system multiple times with no success, because the root cause is a physical break in the calibration ecosystem’s infrastructure. A thorough technician will always perform a full diagnostic scan and a visual inspection of related areas before assuming the problem is calibration alone.
Key Takeaways
- A car pulling to one side after a windshield replacement is a classic symptom of a misaligned ADAS camera, not a mechanical fault.
- Calibration requires microscopic precision; an error of just one degree in a camera or radar sensor’s angle can cause dangerous behavior like phantom braking or incorrect steering.
- The quality of an ADAS calibration depends on certified technicians and the right equipment, not whether it’s a dealer or an independent shop. Always ask for pre- and post-scan reports.
How to Prevent « Phantom Braking » Events on the Highway?
« Phantom braking » is one of the most unnerving ADAS malfunctions, where the automatic emergency braking system engages for no apparent reason. While this can be a symptom of a serious radar misalignment, it can sometimes be caused by simple obstructions. Before scheduling a service appointment, there are a few things you can check yourself to rule out basic issues. The goal is to ensure your vehicle’s digital senses have a clear, unobstructed view.
The forward-facing camera and radar sensors are sensitive to anything that blocks their line of sight. A dirty windshield, bird droppings, or even a dangling parking pass can confuse the camera. Similarly, mud, snow, or a bent license plate bracket can block the radar unit typically mounted in the front grille. Performing a thorough cleaning and inspection is a crucial first step in troubleshooting. If the issue persists after you’ve cleared any potential obstructions, it’s time to seek professional help.
When you visit a shop, mention the specific conditions under which the phantom braking occurs (e.g., « on sunny days, » « when passing under overpasses »). This information can help a technician diagnose the problem, which could range from a needed calibration to a known software issue that requires an update from the manufacturer. Addressing these issues is vital, especially when you consider that properly functioning ADAS features have been shown to reduce certain types of accidents by up to 50%.
Action Plan: Your Pre-Calibration Phantom Braking Checklist
- Clean your windshield thoroughly, both inside and out, paying special attention to the area around the rearview mirror where the camera is located.
- Inspect the front of your car and remove any obstructions like heavy bug splats, mud, or debris from the grille and bumper where radar sensors are housed.
- Remove any items from your windshield or dashboard that could be blocking the camera’s view, such as toll passes, parking permits, or air fresheners.
- Verify that no aftermarket window tint or film has been applied over the camera’s viewing area, as this can distort its vision.
- If the problem continues, contact a dealership with your VIN to check for any open recalls or Technical Service Bulletins (TSBs) related to the ADAS software.
Restoring your vehicle’s ADAS functions is not just about comfort; it’s about ensuring the safety systems you rely on are operating exactly as intended. If you are experiencing any of these issues, the next logical step is to book a diagnostic appointment with a certified ADAS technician who can provide pre- and post-scan reports to guarantee the job is done right.