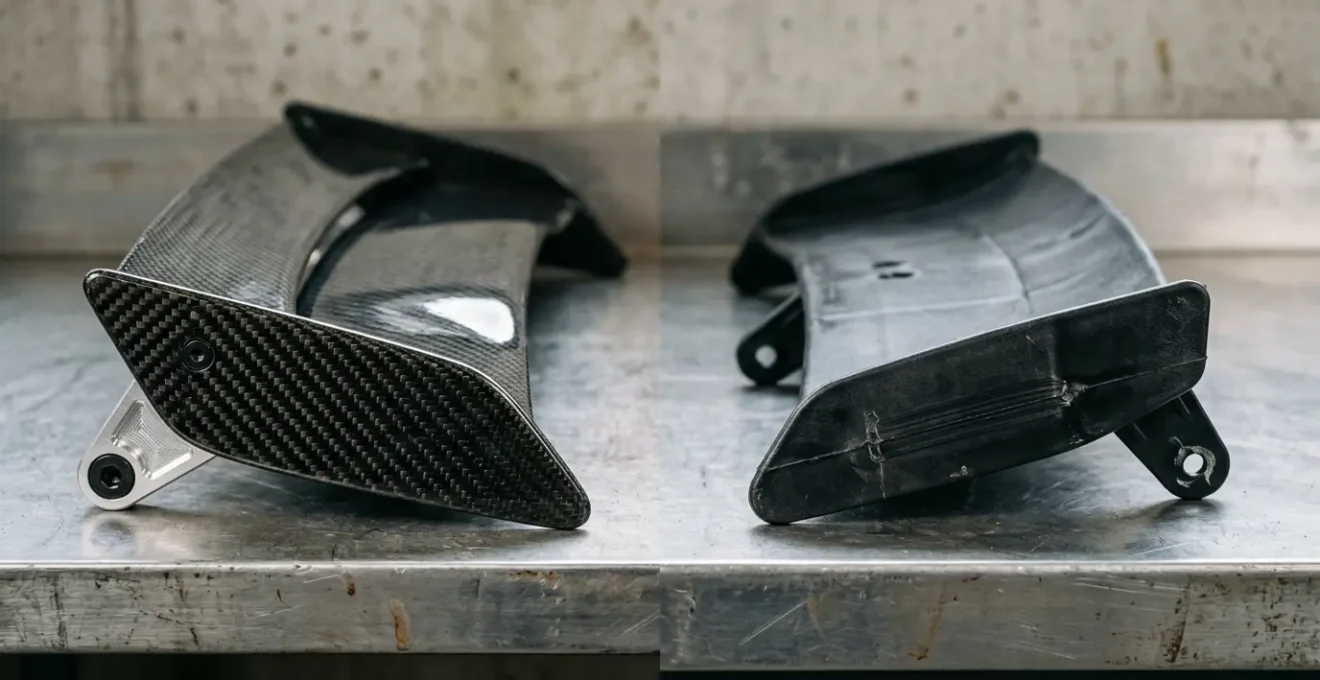
True aerodynamic function is not determined by aggressive looks or expensive materials, but by visible evidence of sound engineering principles.
- Functional components show clear signs of managing airflow and have a structural load path to transfer forces to the chassis.
- Cosmetic parts often ignore airflow, use flimsy mounts, and can increase drag and instability at speed.
Recommendation: Adopt a « first-principles » audit: evaluate any aero part based on its physical purpose, mounting integrity, and material suitability, not its style.
For the discerning track-day hobbyist or efficiency-focused hypermiler, the world of aftermarket aerodynamics is a minefield. The market is saturated with aggressive-looking spoilers, splitters, and diffusers promising race-car performance. Many of these are little more than « automotive jewelry »—cosmetic additions that, at best, do nothing and, at worst, actively harm your vehicle’s stability and fuel economy by creating parasitic drag.
The common wisdom often revolves around simple binaries: carbon fiber is functional, plastic is fake; big wings create big downforce. This is a dangerous oversimplification. The reality is far more nuanced, rooted in the principles of fluid dynamics. Distinguishing a genuinely functional aerodynamic device from a purely cosmetic one doesn’t require a wind tunnel. It requires training your eye to see the physics at play—to perform a first-principles audit of the component’s design, material, and integration with the vehicle.
This guide moves beyond marketing hype to provide a practical, engineering-based framework. We will dissect the tell-tale signs of functional design versus aesthetic styling. By understanding the core principles of airflow attachment, pressure differentials, and structural load paths, you can learn to identify parts that deliver real performance gains and avoid those that just add weight and drag.
This article provides an engineering-focused breakdown to help you analyze aerodynamic components like a professional. Explore the sections below to understand the critical differences between form and function.
Summary: Decoding Real Aerodynamics vs. Pure Styling
- Why Your Stock Spoiler Might Be Generating Dangerous Lift at 80 MPH?
- Carbon Fiber vs. FRP: Which Splitter Survives a Curb Scraping?
- How to Install Underbody Paneling to Gain 2 MPG on the Highway?
- The Drilling Mistake That Causes Rust Under Your New Side Skirts
- When to Adjust Your Rear Wing Angle: A Guide for Track Day Beginners
- 55mph vs. 65mph: How Much Does Speed Really Cost You in Fuel?
- Resonated vs. Straight Pipe: How to Get Sound Without Breaking Decibel Limits?
- How to Mod Your Car for Street Performance Without Getting Pulled Over?
Why Your Stock Spoiler Might Be Generating Dangerous Lift at 80 MPH?
The terms « spoiler » and « wing » are often used interchangeably, but they serve different aerodynamic functions. A true spoiler is designed to « spoil » or disrupt undesirable airflow across the rear of the car, typically to reduce lift without generating significant downforce. In contrast, a rear wing is an inverted airfoil. It works by creating a pressure differential—higher pressure air on its top surface and lower pressure air on its bottom surface—to generate negative lift, or downforce, pressing the car onto the road for increased grip.
Many factory « spoilers » on sedans and hatchbacks are purely cosmetic. Worse, some are poorly designed airfoils positioned at an incorrect angle of attack. Instead of reducing lift, they can act like an airplane wing at speed, creating positive lift that reduces rear-end stability. At 80 mph, this can make the car feel light and unpredictable, especially during high-speed lane changes or in crosswinds. A functional wing or spoiler, however, is engineered to produce a stabilizing effect, as a 2025 CFD analysis confirms that functional spoilers generate significant negative lift (downforce) compared to cars without them.
A key indicator of a functional design is its adjustability and integration. For example, a CFD study on an Audi TT with a specific wing profile found that a minimal 5° angle of attack significantly improved high-speed stability while only increasing the overall drag coefficient by a negligible 0.07%. This demonstrates a professional design balancing downforce with a minimal drag penalty. A cosmetic part lacks this engineering, prioritizing looks over a verifiable, stabilizing pressure differential.
Carbon Fiber vs. FRP: Which Splitter Survives a Curb Scraping?
A common myth is that carbon fiber is always the superior choice for aerodynamic components. While Carbon Fiber Reinforced Polymer (CFRP) offers an exceptional stiffness-to-weight ratio, it is not always the best material for a street-driven car, especially for low-hanging parts like front splitters. The primary function of a splitter is to prevent high-pressure air from going underneath the car, creating a lower-pressure zone that pulls the front end down. However, on a street car, its secondary function is surviving real-world hazards.
CFRP is incredibly strong under tension but is notoriously brittle under impact. A slight misjudgment with a steep driveway or parking curb can lead to a catastrophic failure: the carbon fiber shatters, splinters, and delaminates. This often means a complete replacement is necessary. Fiber-Reinforced Plastic (FRP), on the other hand, is more flexible and resilient. While heavier and less stiff than carbon, an FRP splitter will bend and deform under a similar impact, often resulting in just scrapes or stress cracks rather than complete destruction.
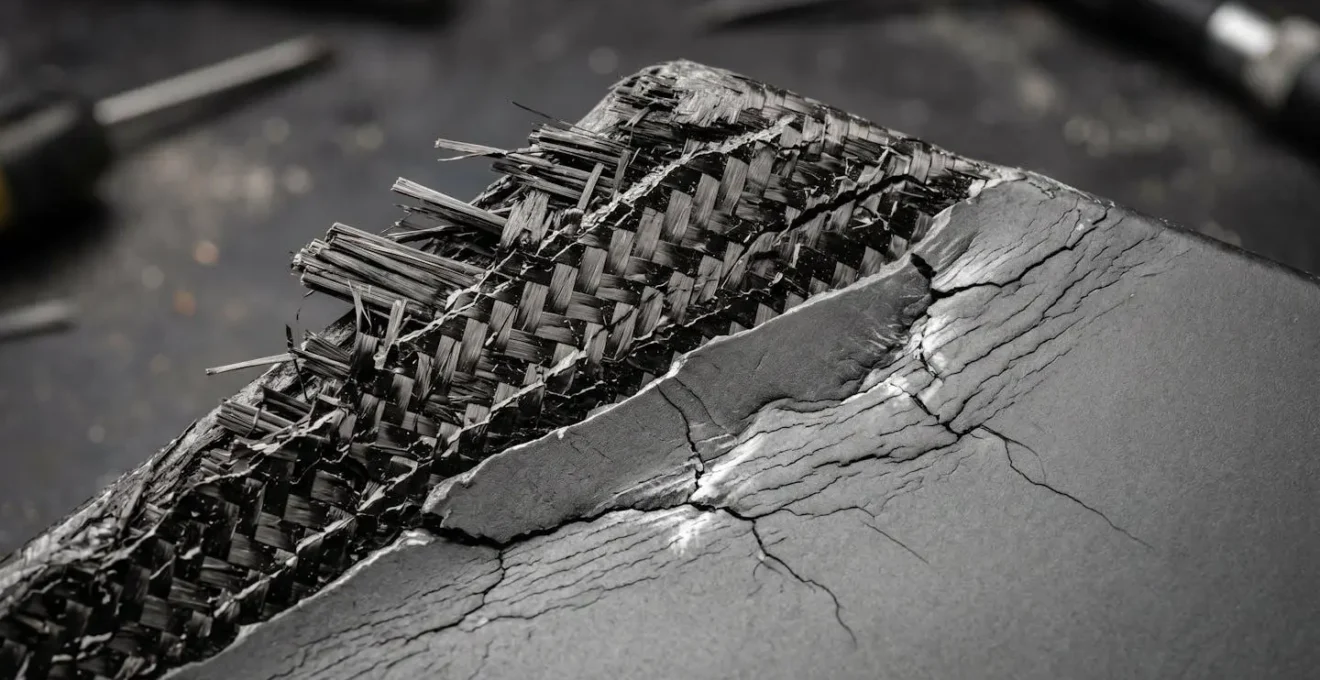
As the visual detail above illustrates, the failure modes are dramatically different. For a track-only car where every gram counts and impacts are less frequent, carbon fiber is a logical choice. But for a dual-purpose or street car, a well-made FRP or even an ABS plastic splitter often represents a much more practical and cost-effective solution. The material choice should align with the vehicle’s intended use and the owner’s tolerance for risk and replacement cost, not just a perceived hierarchy of materials.
How to Install Underbody Paneling to Gain 2 MPG on the Highway?
One of the most effective yet frequently overlooked areas for aerodynamic improvement is the vehicle’s underbody. The exposed chassis components, exhaust system, and suspension create immense turbulence, which translates directly into aerodynamic drag. Smoothing this airflow with flat underbody panels can yield significant efficiency gains, particularly for hypermilers and those who do a lot of highway driving. By creating a smooth, flat surface, you help maintain attached airflow and reduce the drag-inducing turbulence underneath the car.
The results can be substantial. According to industry analysis, a full or partial underbody paneling system can deliver a 1-5% fuel economy improvement, with the benefits becoming more pronounced at sustained highway speeds. A well-documented DIY project on a 1997 Volvo 960 demonstrated this principle in action. The owner systematically sealed open areas under the car with aluminum and ABS plastic, raising the vehicle’s highway mileage from a baseline of 28.0 mpg to over 30 mpg at a steady 65 mph. This is a tangible gain achieved by simply managing underbody air.
Choosing the right material is critical for safety and longevity. While cheap materials are tempting, they can pose a fire hazard or fail prematurely. The following table provides a guide for selecting the appropriate material for your underbody project.
| Material | Durability | Heat Resistance | Weight | Cost | Best Application |
|---|---|---|---|---|---|
| Coroplast | Low | Poor (fire hazard) | Very Light | Low | Temporary testing only |
| ABS Plastic | Medium | Good (thermoformable) | Light | Medium | Front sections, DIY builds |
| Aluminum | High | Excellent | Medium-High | Medium-High | High-heat areas, long-term use |
| Professional Kits | Very High | Excellent (engineered) | Optimized | High | Integrated design, warranty support |
Properly engineered underbody panels will also account for heat dissipation from the exhaust and transmission and include access points for maintenance. This is a modification where function directly translates to measurable efficiency.
The Drilling Mistake That Causes Rust Under Your New Side Skirts
A functional aero part is only as good as its installation. Even the most well-designed side skirts or splitters become useless or dangerous if they are not securely attached to the vehicle’s chassis. More insidiously, improper installation creates a direct pathway for a car’s worst enemy: rust. The single biggest mistake DIY installers make is drilling a hole into the car’s body or rocker panel and driving a screw into it without properly treating the exposed bare metal.
When you drill through factory paint and E-coat, you expose raw steel to moisture. Water wicks in around the fastener, gets trapped behind the newly installed part, and begins to corrode the metal from the inside out. As the Sprinter Adventure Van conversion guide wisely points out when discussing van modifications:
Self-drilling and self-tapping screws will cut through any paint. Rivnuts/plusnuts, rivets, and bolts will be less likely to do this after you’ve primed the hole they fit into.
– Sprinter Adventure Van conversion guide, Van modification rust prevention best practices
This highlights the need for a professional methodology. The solution is to create a multi-layer barrier that isolates the bare metal from the environment. This involves deburring the hole, applying a high-quality primer, and using a sealant during final assembly. This ensures a strong mechanical bond and a waterproof seal, preserving the structural integrity of your vehicle’s chassis for years to come.

A professional installation using rivnuts with proper sealant, as depicted in the clean workshop environment above, is a hallmark of a functional and durable modification. It represents a robust structural load path and a long-term commitment to the vehicle’s health, distinguishing a serious upgrade from a temporary, damage-inducing cosmetic piece.
When to Adjust Your Rear Wing Angle: A Guide for Track Day Beginners
For the track-day enthusiast, an adjustable rear wing is a powerful tool for tuning a car’s handling balance. However, without a systematic approach, it’s easy to make the car slower and more dangerous. The common beginner mistake is to immediately set the wing to its most aggressive angle of attack (AoA), assuming more is always better. This ignores the critical concept of the drag penalty.
As you increase a wing’s AoA, both downforce and drag increase. The problem is that they do not increase linearly. As found by a 2017 study in the International Journal of Applied Engineering Research, the spoiler angle affects both downforce and drag exponentially. Beyond a certain point, a small increase in angle yields diminishing downforce gains while causing a massive increase in drag. This not only kills your straight-line speed but can also severely unbalance the car, leading to excessive oversteer if the front axle doesn’t have a complementary aerodynamic device (like a splitter).
For a beginner, the goal is not to find the absolute peak of downforce, but to find a setting that provides predictable, confidence-inspiring handling. The key is to start conservatively and make small, documented, incremental changes. This allows you to feel how the car’s balance shifts in high-speed corners and evaluate the trade-off against straight-line speed.
Action Plan: Baseline Wing Angle Methodology for Track Day Beginners
- Start Conservative: Begin with the manufacturer’s recommended setting or the lowest angle of attack (typically 5-10°) to establish a baseline handling characteristic.
- Document Systematically: Complete 3-5 consistent laps at your baseline setting, noting subjective feel in high-speed corners and recording any available data (GPS lap timer, corner speeds).
- Adjust Incrementally: Increase angle by only 1-2 degrees. Resist the temptation to make multiple changes simultaneously (e.g., tire pressure and wing angle).
- Monitor Trade-offs: Track both cornering stability improvements and straight-line speed reductions. A small angle change can provide measurable stability with a minimal drag penalty.
- Prioritize Consistency: The goal for beginners is repeatable lap times and predictable handling, not finding the absolute limit. Master car control before optimizing aero balance.
55mph vs. 65mph: How Much Does Speed Really Cost You in Fuel?
Understanding the non-linear cost of speed is fundamental for any hypermiler or efficiency-conscious driver. The power required to overcome aerodynamic drag is not linear; it increases dramatically with speed. This is the single biggest factor affecting your fuel economy on the highway. While rolling resistance and drivetrain losses play a part, air resistance is the dominant force your engine must fight at higher velocities.
The physics are unforgiving. As automotive performance analysis shows, aerodynamic drag increases with the square of velocity. This means even a modest increase in speed has a disproportionately large impact on the power required. For example, increasing your speed by about 18% from 55 mph to 65 mph results in a demand for approximately 39% more power just to push the air out of the way. Your engine must burn more fuel to provide this extra power, causing a significant drop in MPG.
This effect is compounded by the vehicle’s inherent aerodynamic profile, defined by its drag coefficient (Cd) and frontal area. A boxy SUV with a high Cd will suffer a much greater fuel penalty for increasing speed than a sleek, modern sedan. This is why aerodynamic modifications, like the underbody panels discussed earlier, can be so effective. By reducing the baseline drag, you lower the entire curve of power required versus speed.
The table below illustrates how this speed penalty differs across various vehicle types and how aerodynamic improvements can mitigate it.
| Vehicle Type | Baseline Cd | Power at 55mph | Power at 65mph | Fuel Penalty (%) | Aero Mod Impact |
|---|---|---|---|---|---|
| Modern Sedan (Cd 0.28) | 0.28 | Baseline | +39% | 15-20% | Low drag = smaller penalty |
| SUV/Crossover (Cd 0.35) | 0.35 | Baseline | +39% | 22-28% | Higher baseline drag compounds |
| Sports Car w/ Aero (Cd 0.32) | 0.32 | Baseline | +39% | 18-23% | Downforce adds drag tax |
| Truck w/ Side Skirts | Reduced 7% | Baseline | +39% | Reduced penalty | Side fairings boost efficiency up to 7% |
Resonated vs. Straight Pipe: How to Get Sound Without Breaking Decibel Limits?
While not a primary aerodynamic component, the exhaust system is a popular modification for street performance, and its design choices have significant implications. The central debate for enthusiasts often lies between a « straight pipe » setup and a resonated exhaust. A straight pipe, which removes mufflers and resonators, offers the least restricted path for exhaust gases, potentially freeing up minimal horsepower. However, it also produces maximum volume and often an unrefined, raspy tone that can easily exceed legal decibel limits and attract unwanted attention.
A resonated exhaust system offers a more sophisticated compromise. A resonator is essentially a chamber designed to cancel out specific, undesirable sound frequencies—typically the harsh, droning noises that occur at steady cruising speeds. It does this through sound wave cancellation, without adding significant restriction like a complex muffler. This allows the car to retain a loud, aggressive note under acceleration while being more civilized and legal at cruise. High-quality aftermarket systems use carefully tuned resonators and high-flow mufflers to achieve a desirable sound profile without a major performance penalty.
From an aerodynamic perspective, the exhaust’s *exit* can be relevant. On cars with functional rear diffusers, the placement and design of the exhaust tips can influence the diffuser’s effectiveness. Hot, high-velocity exhaust gases can help energize the airflow exiting the diffuser, enhancing its ability to create a low-pressure area under the car. However, for most street cars, the acoustic and legal considerations of a resonated versus straight-pipe system are far more critical than any minor aerodynamic interaction.
Key Takeaways
- Function Follows Form: Real aero has features dictated by airflow (e.g., endplates on a wing, proper curvature), not just aggressive styling.
- Mounting Matters: A functional part must have a robust structural load path to the chassis. Flimsy brackets or double-sided tape are signs of a cosmetic part.
- Material is Practicality: The best material (Carbon vs. FRP vs. ABS) depends on the car’s use. Brittleness of carbon is a real risk on the street.
- Drag is the Tax: Every aero device that generates downforce also adds drag. The goal of good engineering is to maximize the downforce-to-drag ratio.
How to Mod Your Car for Street Performance Without Getting Pulled Over?
Modifying your car with aerodynamic components for street use requires a balance between achieving functional gains and maintaining legal compliance. Law enforcement is often on the lookout for modifications that pose a safety hazard to other road users, and aggressively styled aero parts are a frequent target. The key to avoiding citations is to choose and install parts that are effective, safe, and adhere to local vehicle regulations.
The most common violations relate to components protruding from the vehicle’s body, obstructing visibility, or lacking secure mounting. Sharp, unfinished edges on a front splitter can be deemed a pedestrian hazard, while a wing that extends beyond the car’s width or a canard that blocks a turn signal is an easy ticket. Ensuring your modifications are well-engineered and thoughtfully installed is your best defense.
Case Study: The « OEM+ » Aero Strategy for Legal Compliance
A highly effective and low-risk approach is the « OEM+ » strategy. This involves sourcing aerodynamic components from higher-trim or performance versions of your same car model (e.g., fitting a Porsche 911 GT3 front bumper to a base 911). These parts are 100% legal for street use as they have been designed, tested for safety, and validated in wind tunnels by the original manufacturer. As a strategic approach to improving aerodynamics, this method provides documented functional benefits and rarely draws unwanted law enforcement attention, representing the pinnacle of street-legal performance modification.
Before installing any exterior part, it’s crucial to consult your local vehicle codes. However, following a general checklist of best practices can help you stay on the right side of the law while still improving your car’s performance and aesthetics.
- Width Compliance: Verify that wings, splitters, and canards do not extend beyond the vehicle’s original body width.
- Pedestrian Safety: Ensure splitter and canard leading edges are rounded or beveled, not sharp.
- Lighting Clearance: Confirm that no part of the aero kit obscures headlights, turn signals, brake lights, or the license plate.
- Ground Clearance: Maintain your jurisdiction’s minimum ground clearance to avoid equipment violations.
- Secure Mounting: Use bolts, nuts, and rivnuts for installation. Adhesive-only or zip-tie mounting is unsafe and often illegal.
Ultimately, a smart modification strategy focuses on functional, well-engineered parts that are installed correctly. To apply these principles to your own vehicle, the next logical step is to perform a first-principles audit of your current setup or any parts you are considering.