
Retrofitting modern technology into a classic car is less about what you add and more about respecting the vehicle’s original engineering and knowing the critical decision points.
- True value preservation comes from upgrades that are either reversible or solve a fundamental flaw without altering the car’s core character.
- System-wide thinking is non-negotiable; a simple component swap like an LED bulb or an AC refrigerant change requires addressing the entire supporting system to avoid failure or loss of value.
Recommendation: Prioritize upgrades that enhance safety and reliability with « mechanical sympathy, » and always have a long-term plan for sourcing critical, soon-to-be-discontinued parts.
There’s a unique joy in owning a classic car—the smell of the interior, the sound of the engine, the direct connection to the road. But there’s also the undeniable frustration of ’70s-era sealed-beam headlights on a dark, rainy night or an air conditioning system that offers more noise than cool air. The temptation to reach for modern conveniences is strong, and a cottage industry has sprung up to meet that demand, offering everything from Bluetooth stereos to complete electric vehicle conversions.
The common advice is often dangerously simple: « Just put in LEDs, » « Swap the AC, » or « Upgrade the stereo. » This approach treats a classic car like a collection of interchangeable parts, ignoring the delicate balance of its original engineering. A thoughtless modification can quickly become a value-destroying one, creating a car that is neither authentically classic nor reliably modern. The true art of the restomodder lies not in a willingness to cut and weld, but in a deep understanding of mechanical sympathy.
This guide moves beyond the simple « what to do » and focuses on the « when » and « how. » It’s about identifying the tipping points—the moments where a modification becomes a logical, value-adding decision rather than an act of sacrilege. It’s a framework for navigating the restorer’s dilemma: how to enhance the driving experience without erasing the very soul you fell in love with. We will explore key systems and provide the strategic thinking needed to make smart, reversible, and reliable upgrades that honor your car’s heritage.
To help you navigate these critical decisions, this article breaks down the most common modernization challenges. Below is a summary of the key areas we will cover, providing a clear roadmap to upgrading your classic with confidence and respect.
Summary: A Guide to Sympathetic Modernization
- Hydraulic vs. Electric Column Retrofit: Which Retains Better Road Feel?
- How to Install LED Bulbs in Halogen Housings Without Creating Glare?
- R12 to R134a: How to Convert Your AC System Without Killing the Compressor?
- The Fuse Box Mistake That Burns Down Restomod Projects
- When to EV Swap a Classic: The Point Where Engine Maintenance Exceeds Conversion Cost?
- When to Abandon Air Suspension: The Break-Even Point for Conversion Kits?
- When to Buy Critical OEM Spares Before They Are Discontinued Forever?
- The Action Plan: Prioritizing Your Critical Spares Purchase
Hydraulic vs. Electric Column Retrofit: Which Retains Better Road Feel?
The debate over power steering in a classic car often centers on a perceived loss of « purity » and road feel. Purists argue that manual steering is the only way to experience a car as its designers intended. While hydraulic systems have been a long-standing retrofit option, they often come with their own compromises: engine-bay clutter, potential fluid leaks, and a constant parasitic draw on the engine. The modern alternative, Electric Power Steering (EPS), offers a more elegant solution, but the key is choosing and tuning a system with mechanical sympathy.
The fear is that EPS will feel numb and disconnected, like an early-2000s economy car. However, high-quality, programmable EPS kits do the opposite. They allow for a light steering effort at parking-lot speeds while progressively firming up as speed increases, preserving crucial highway feedback. This programmability means the system can be tailored to the car’s specific characteristics and the driver’s preference, something impossible with most hydraulic setups.
Case Study: Datsun 240Z Rally Car EPS Conversion Success
A Tarmac rally Datsun 240Z received an electric power steering retrofit that allowed aggressive wheel alignment without excessive steering weight. The speed-sensing feature maintained steering feedback at higher speeds while reducing bump steer, demonstrating how programmable EPS systems can preserve driving dynamics while adding convenience. The owner reported it as one of the best improvements made to the competition vehicle, proving that an electric system, when implemented correctly, can enhance rather than detract from the driving experience.
Ultimately, the choice hinges on intent. For a concours-correct restoration, originality is paramount. But for a classic that is meant to be driven regularly, a well-implemented EPS system is arguably the superior choice. It offers the benefits of reduced effort without the clutter of a hydraulic pump, and most importantly, modern systems can be tuned to retain or even enhance road feel, making the car more enjoyable and accessible on long drives or in city traffic.
How to Install LED Bulbs in Halogen Housings Without Creating Glare?
Upgrading to LED headlights seems like a simple, obvious safety improvement. The reality is far more complex and dangerous if done incorrectly. The single biggest mistake is simply plugging an LED bulb into a housing designed for a halogen filament. This creates dangerous glare for oncoming drivers and often results in poorer road illumination, despite the bulb’s apparent brightness. The problem isn’t the LED itself, but a fundamental misunderstanding of optical physics.
Unless you can adjust the LED bulb in such a manner as to absolutely duplicate the exact focal point of the halogen ones, it will produce diffuse light (glare) and reduce the ability to put light where it should be.
– BobIsTheOilGuy Forum Technical Discussion, Automotive Lighting Technical Forum
A halogen housing uses a reflector bowl engineered to capture light from a very specific point in 3D space—the glowing filament—and focus it into a controlled beam. An LED bulb emits light from a series of chips on a flat circuit board. If the position of those chips does not perfectly mimic the original filament’s location, the reflector cannot focus the light correctly. The result is uncontrolled light scatter, or glare.
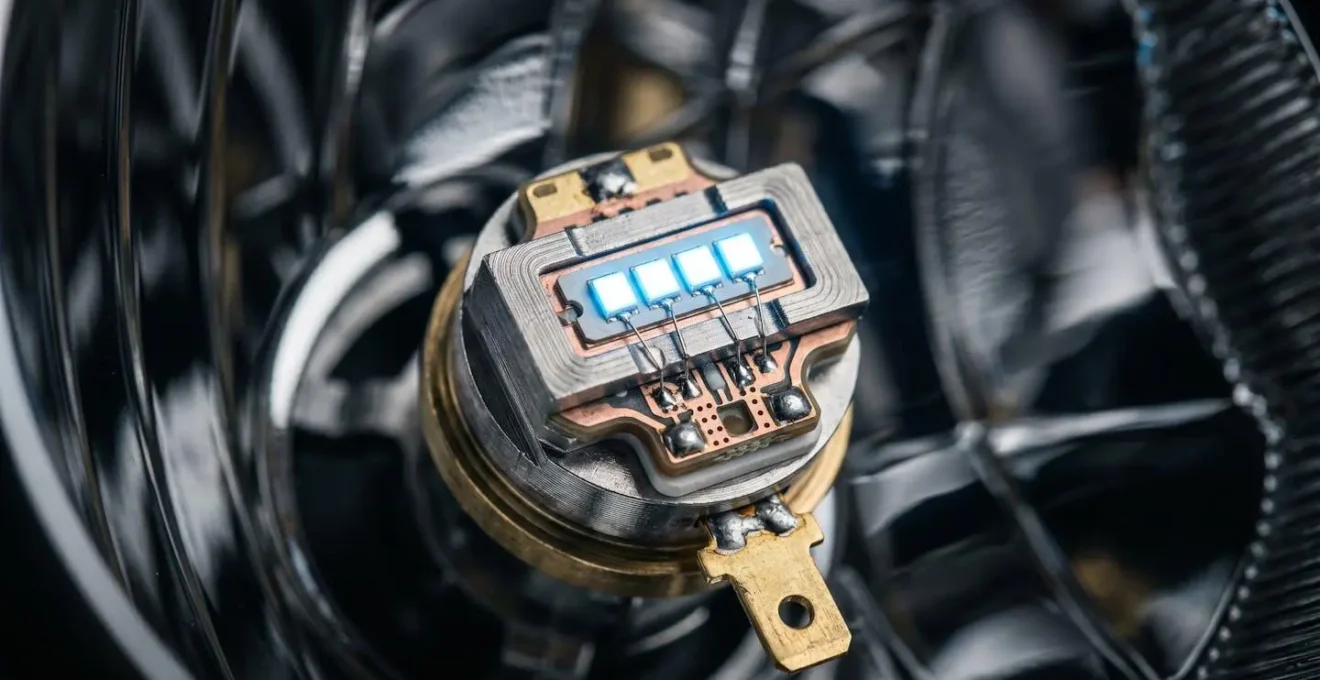
As the image demonstrates, high-quality LED replacement bulbs are engineered with their light-emitting chips placed precisely to replicate the original halogen filament’s focal point. This precision is non-negotiable for a successful and safe conversion. Cheaper bulbs often have poor chip placement, leading directly to glare and a failed beam pattern. Therefore, success hinges entirely on selecting a bulb designed with optical accuracy and performing a mandatory re-aiming of the headlights post-installation to ensure a sharp, low cutoff that protects other drivers.
Action Plan: LED Headlight Conversion Checklist
- Identify Your Housing Type: Determine if you have reflector or projector headlights, as this affects bulb choice and beam quality.
- Choose LEDs with Centered Chip Height: Select bulbs where the LED chip position precisely matches the original halogen filament’s focal point to ensure proper focus.
- Verify Cooling System Design: Ensure the bulb has adequate thermal management (fan or heat sink) to prevent dimming and maintain long-term brightness.
- Mandatory Beam Alignment: After installation, aim headlights down to create a sharp cutoff line just below the bulb’s center height to prevent glare.
- Consider Period-Correct Color: Choose warmer white LEDs (3000K-4500K) over cool blue (6000K+) to maintain a vintage aesthetic while improving visibility.
R12 to R134a: How to Convert Your AC System Without Killing the Compressor?
With the original R12 refrigerant being expensive and heavily regulated, converting a classic car’s air conditioning system to modern R134a is a common project. However, it’s also one of the most frequently botched jobs, often leading to a seized compressor and a repair bill far exceeding the initial conversion cost. The critical mistake is believing it’s a simple « evacuate and refill » process. The two refrigerants and their corresponding oils are chemically incompatible, and any cross-contamination is catastrophic.
Before starting, it’s crucial to manage expectations. The conversion is a compromise on performance. As documented by automotive AC specialists, R12 can blow 6 to 7 degrees cooler than R134a and is 15% more efficient. The primary reason for conversion is cost and availability, not superior cooling. To mitigate this performance loss and ensure reliability, a strict protocol must be followed. The number one killer of retrofitted compressors is oil incompatibility. R12 uses mineral oil, while R134a uses PAG or POE oil. When mixed, they form a thick, destructive sludge known as « black death » that starves the compressor of lubrication, causing it to seize.
A proper conversion requires a complete system-wide approach:
- Total System Flush: Every drop of old mineral oil must be removed from the evaporator, condenser, and all lines.
- Component Replacement: The original filter drier (or accumulator) is not compatible with R134a and must be replaced. All rubber O-rings must also be swapped for modern, R134a-compatible HNBR versions.
- Condenser Upgrade: R134a is less efficient at transferring heat. Replacing the old tube-and-fin condenser with a modern, high-efficiency parallel-flow condenser is the single most important step to regain lost cooling performance.
- Correct Charge: The system should be charged with only 70-80% of the original R12 capacity. Overcharging with R134a will lead to excessively high head pressures and damage the compressor.
The cost will be a very important issue if an R134a retrofit is to be undertaken, but do not sacrifice performance and reliability for the sake of cost.
– Classic Auto Air Technical Documentation, R12 to R134a Retrofit Guidelines
The Fuse Box Mistake That Burns Down Restomod Projects
When adding modern, high-draw components like electronic fuel injection (EFI), electric cooling fans, and high-power audio systems, owners rightly focus on upgrading the fuse box. But they often overlook the most common point of failure: the ground path. An inadequate or corroded ground is the single biggest electrical mistake in restomod projects, creating resistance that generates heat and can easily lead to a fire. The danger is real; according to 2021 U.S. fire department data, electrical malfunctions are a leading cause of residential fires, a principle that applies directly to the complex wiring of a modified vehicle.
Original classic car electrical systems were designed for low-amperage components. A 50-year-old chassis with a few rusty, paint-covered grounding points is simply not capable of providing the clean, robust ground path that modern electronics require. Adding a new fuse box without creating a corresponding modern grounding system is like installing a new circuit breaker panel in a house but leaving old, frayed wiring in the walls. The fuse may not blow, but the wire itself becomes the failure point.
Case Study: The Aluminum Wiring Fire Hazard
The lessons from residential construction are directly applicable. According to the Consumer Product Safety Commission, homes with pre-1972 aluminum wiring are 55 times more likely to have fire hazard connections than copper-wired homes. Many classic cars from certain eras also used aluminum wiring, which is prone to corrosion and loosening at terminal connections. This historical parallel demonstrates why simply plugging high-draw modern parts into an original harness is a significant fire risk, and why a complete rewiring with a dedicated grounding strategy is critical for a safe restomod.
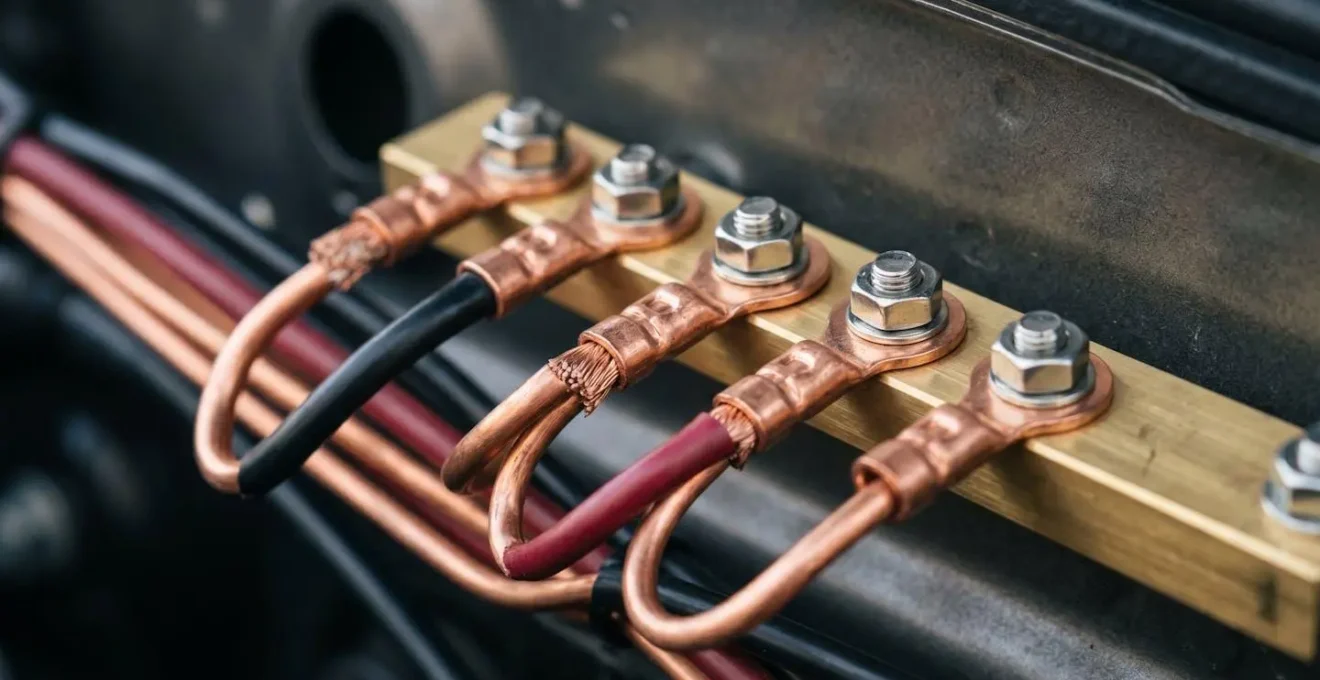
The solution is to think of the electrical system as a complete circuit. A proper restomod requires a dedicated grounding system. This involves running heavy-gauge ground wires from major components (alternator, battery, engine block, EFI computer) directly to a common, clean grounding point or bus bar that is securely fastened to the chassis. All paint, rust, and undercoating must be removed from the connection point to ensure a clean metal-to-metal contact. This ensures that the high currents drawn by modern accessories have an unrestricted path back to the battery, preventing heat buildup and potential fire.
When to EV Swap a Classic: The Point Where Engine Maintenance Exceeds Conversion Cost?
The idea of an electric vehicle (EV) conversion for a classic car is one of the most polarizing topics among enthusiasts. For many, the internal combustion engine is the car’s heart and soul. For others, the promise of modern reliability, quiet operation, and effortless torque is an irresistible proposition. The decision to « go electric » shouldn’t be based on trends, but on a cold, hard evaluation of the specific car in question. The « tipping point » for an EV conversion is where it becomes an act of preservation rather than destruction.
Case Study: Everrati’s Reversible EV Conversion Philosophy for Classic Mercedes
The British firm Everrati exemplifies the preservationist approach. They convert classic cars like the Mercedes « Pagoda » to electric power while ensuring the process is fully reversible. By using original factory mounting points for the motor and batteries, they can, in theory, return the car to its original state. This methodology positions the EV conversion not as a permanent alteration, but as a modern, reliable « cassette » that can be installed to make a classic usable as a daily driver, especially when the original engine was already non-original, missing, or catastrophically damaged.
The key to making a value-preserving decision is to analyze the car as two separate entities: the chassis/body and the drivetrain. Where does the majority of the car’s value and uniqueness lie? A mass-produced car with a rare, numbers-matching engine is a terrible candidate for conversion; the engine is the most valuable part. Conversely, a car with a beautiful, rare, or historically significant body but a mundane or destroyed engine is an excellent candidate. The EV swap preserves the unique coachwork while making the car drivable and reliable again.
The following decision matrix provides a framework for evaluating whether an EV conversion is a value-adding or value-destroying proposition for your specific classic car.
| Vehicle Profile | Original Drivetrain Value | Chassis/Body Uniqueness | Conversion Recommendation | Rationale |
|---|---|---|---|---|
| Beautiful rare car, destroyed/mundane engine | Low (non-original or common) | High (rare body/chassis) | Excellent Candidate | Conversion preserves unique chassis while improving usability |
| Common car, numbers-matching rare engine | High (original, rare) | Low (mass-produced) | Poor Candidate | Destroys most valuable component; reduces collector value |
| Modified restomod, already non-original | Low (already swapped) | Medium | Good Candidate | No originality loss; gains modern reliability |
| Concours-correct show car | High (original, documented) | High | Avoid Conversion | Maximum value lies in complete originality |
When to Abandon Air Suspension: The Break-Even Point for Conversion Kits?
For owners of classics equipped with factory air suspension—like certain Lincolns, Mercedes-Benz, or Cadillacs—the system provides an unmatched ride quality when it works. When it doesn’t, it can be an endless and costly source of frustration, from leaking air springs to failed compressors and baffling electronic faults. The constant question is: do you keep chasing expensive, intermittent problems with OEM parts, or do you abandon the system for a reliable coil spring conversion kit?
If originality isn’t as much of a concern to you, and you would prefer to modernize its feel, then adding modern technology to a classic car is worth investigating.
– Bid Garage Classic Car Analysis, Classic Cars with Modern Technology
This decision represents a classic « tipping point. » Continuing to repair a failing system can feel like throwing good money after bad, while converting to coils can feel like an admission of defeat that sacrifices the car’s unique character. To make a logical, non-emotional decision, a structured framework is needed. Rather than waiting for a complete, catastrophic failure that leaves you stranded, you can use a « three strikes » rule to determine when the financial and practical break-even point has been reached.
The key is to differentiate between isolated component failures and systemic deterioration. A single failed air spring is a repair; a cascade of seemingly unrelated problems is a clear signal that the entire system is reaching the end of its service life. At that point, a high-quality conversion is not a downgrade, but a smart, value-preserving move that ensures the car remains reliable and drivable for years to come. The only exception is for concours-level vehicles, where absolute originality is the primary source of value, and repair costs are secondary.
Action Plan: Three Strikes Framework for Air Suspension Abandonment
- Strike 1 – Single Major Component Failure: When one major part (compressor, air spring, valve block) fails, repair it with quality parts and document the cost and date.
- Strike 2 – Second Different Component Fails Within 18 Months: Begin researching high-quality conversion kits. Calculate your total air suspension repair costs over the last two years versus the investment in a conversion.
- Strike 3 – Cascade Failure or Undiagnosable Problem: Immediately proceed with conversion. Multiple simultaneous failures or problems that even specialists cannot diagnose indicate systemic failure beyond an economical repair.
- Premium Conversion Requirement: Use only well-engineered kits from reputable brands that aim to preserve the intended ride characteristics. A cheap kit destroys both originality and ride quality.
When to Buy Critical OEM Spares Before They Are Discontinued Forever?
Perhaps the most strategic act of modernization is ensuring your classic car can be maintained in the future. As vehicles age, manufacturers slowly discontinue parts, moving them to a status of NLA (No Longer Available). Once this happens, owners are at the mercy of the used market or, increasingly, low-quality reproductions. The savviest owners don’t just restore their cars; they proactively build a curated inventory of critical spares before they vanish forever. The key is knowing what to buy and when.
The « tipping point » for buying a spare part is the moment just before its availability shifts from « in stock » to « unobtanium. » Learning to recognize the early warning signs of this shift is a crucial skill. It’s an exercise in market intelligence, watching forums, talking to parts specialists, and monitoring manufacturer communications. Waiting until a part fails is often too late; by then, the global supply may already be gone.
The most reliable indicators that a part is on the verge of becoming NLA include:
- Forum Demand Patterns: The part consistently appears in « Want to Buy » posts across multiple owner forums, signaling that normal supply channels have dried up.
- Dealer Backorder Status: OEM dealers list the part as « backordered indefinitely » rather than providing a specific restock date.
- Aftermarket Quality Decline: Cheap, poorly made reproductions begin to flood online marketplaces, a sure sign the OEM has ceased production.
- Anniversary Restoration Waves: The car crosses a key milestone (25, 30, 40 years old), sparking a surge in restorations that rapidly depletes remaining OEM stock.
- Official Communication: The manufacturer issues a « final production run » notice, giving a clear but limited window to purchase.
By monitoring these signals, you can move from a reactive « repair » mindset to a proactive « curation » strategy. This foresight is what separates a car that can be enjoyed for another generation from one that becomes a static museum piece, waiting for a part that no longer exists.
Key Takeaways
- Modernization success lies in respecting systemic integrity; a single component change often requires upgrading the entire supporting system.
- Reversibility is the gold standard for preserving value. When an upgrade is not reversible, it should solve a major flaw without erasing the car’s identity.
- Proactively sourcing critical NLA (No Longer Available) parts is as important as any modification. Build a prioritized spares list before it’s too late.
The Action Plan: Prioritizing Your Critical Spares Purchase
Once you’ve learned to identify the signs that parts are becoming scarce, the next step is to create a prioritized action plan. You can’t buy one of everything, so you must focus your resources on the parts that represent the biggest future risks. An effective way to approach this is with a « Pyramid of Spares Prioritization. » This strategy organizes parts into tiers based on their failure impact and the likelihood of quality aftermarket alternatives ever becoming available.
The base of the pyramid consists of parts that are unique, prone to degradation, and almost never reproduced with any accuracy. The top of the pyramid represents the « car killers »—components whose failure would render the vehicle unusable, with no viable repair or replacement path. Focusing your initial efforts on the base and top tiers is the most effective way to future-proof your classic. Generic mechanical wear items like brake pads or filters can almost always be sourced from the aftermarket and should be the lowest priority for stockpiling.
This pyramid provides a clear framework for making purchasing decisions, turning a vague sense of anxiety into a concrete, manageable shopping list. It allows you to strategically invest in your car’s future, ensuring it remains on the road for decades to come.
| Priority Tier | Part Category | Examples | Failure Impact | Purchase Urgency |
|---|---|---|---|---|
| Base – Buy First | Unique rubber and plastic components | Specific trim pieces, weather seals, model-specific hoses, unique gaskets | Irreplaceable; car becomes incomplete | Immediate when NLA signs appear |
| Middle Tier | High-wear electromechanical parts | Unique sensors, model-specific switches, climate control modules, instrument clusters | Renders systems inoperable | Within 12 months of warning signs |
| Top – Car Killers | Structural essentials without alternatives | Specific ECUs, body-integrated computers, unique glass, structural chassis components | Vehicle becomes unusable or illegal to drive | Buy immediately upon availability |
| Low Priority | Generic mechanical wear items | Brake pads, filters, belts, standard bearings | Available through aftermarket indefinitely | Normal replacement schedule |
By embracing this strategic approach—analyzing tipping points, respecting systemic integrity, and planning for the long term—you transform yourself from a mere owner into a true custodian of automotive history. Begin today by assessing your classic’s weakest system and creating a prioritized plan for either a sympathetic upgrade or sourcing its critical spare parts.